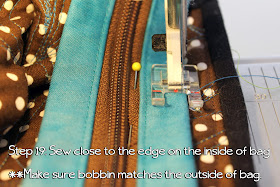
Here is a helpful ticture tutorial on how to make the Sweet Retreat's Little Sister Tote Bag. (This is not the actual pattern, just helpful photos and tips.) This tutorial will be included in the PDF Sweet Retreat's Little Sister Pattern soon and is available HERE.


We hope this helpful! If you have any questions, don't hesitate to contact us! Click on the photos to enlarge them.


Thank you for this tutorial. I am in the process of making my second one of these and could not figure out the "fold down and top stitch" on the zipper. I could not get it to fit into the end tabs the way I was doing it. Now I understand.
ReplyDeleteThanks.
Hi Tina, my name is amanda, and i am getting ready to make this bag but i was wondering if you could give me the measurements... i love the size and style of the bag... Ty amanda
DeleteHi Amanda,
DeleteYou can buy the pattern at http://www.wpcreek.com/item.php?itemid=1218 . The bag measurements are 17"w x 12"h x 6"d.
Bernie @ Whistlepig Creek Productions
I have another question, are we allowed to sell these bags if we make them as long as we give the credit to you, or were not allowed to sell the ones we make? Thank you whistlepig creek productions
DeleteHi Amanda,
DeleteOur copyright states that you can sell your finished projects for profit, you just can't mass produce them. You don't need to give us credit unless you want to. We have people that sell finished projects on Etsy and EBay. So go for it and enjoy.
Bernie @ Whistlepig Creek Productions
I love this bag and I'm going to attempt it but I know it's going to be challenging for me because I don't have a visual but the other thing that would be helpful is the printing the instructions should be in Black the white is very difficult to read
DeleteThe tutorial is helpful but I wish it was a video I wish you would put some of it up on YouTube so you we can actually visually see the process you don't have to give away your measurements but it would be a lot more helpful for me
DeleteI love this pattern and the tutorial makes the instructions even clearer. Here is my version of your bag. http://sunshinesews.blogspot.com/2013/09/sweet-retreats-little-sister-tote.html
ReplyDeleteI will definitely be making more! Thank you so much.
Thanks so much for the wonderful comments. I saw your bag on your blog and love love love your fabric choices!!!
ReplyDeleteSue
Good Day, I was so happy to find your tutorial. Your photos in close up were very explanatory and helped me comprehend the détails. I had paid and downloaded this pattern because the comments were that it was well explained. I was very disappointed that the informations were very limited since i am also basikely french speaking. I greatly appreciate you taking the time with these informations. My bag is finished and I am very happy to have found your site. Thank You!
ReplyDeleteHello. I've been a garment sewer for 40 years, jackets, pants, coats, tops, even home dec. I saw this bag at a guild meeting and bought the pattern. But for the life of me I can't figure out some of the instructions. I usually over-think, but since I'm unaccustomed to quilting world patterns, and you have this lovely blog entry, I thought I'd ask:
ReplyDelete1) The order of operations is confusing me. It says to quilt before I cut, but I have to cut before I can quilt. I think I'm supposed to quilt both the outer and lining fabrics into a finished size 18-1/2 x 30-1/2. Correct?
2) The cutting instructions mention Front Pockets and Bag Sides are quilted but this isn't mentioned in the 'Before You Start Cutting" part when you're quilting the fabric. If you've only quilted the 18-1/2 x 30-1/2, what are you cutting them from? Based on Diagram 3, it seems like I should quilt another piece, but it only needs to be 14 x 30 maybe?
3) I see something called "WOF" but it's never defined. It's probably 'width of fabric'? I'm using yardage I received, I "assume" is a typical width, because I'm pretty sure quilting cottons only come in 45", but I don't know for sure as it's not something I buy. If I make some assumptions, I believe I'll want 2 pieces 12x22 (but it's folded in half lengthwise, so it appears to be 6x22)? This is probably it, but I want to confirm.
thanks in advance for your help - I figured it best to ask before I cut!
Hi we are so sorry for the confusion, and thanks for asking! We are happy to help.
ReplyDeleteYou do quilt before you cut. Layer all of fabric A and 14 1/2" cut of fabric B on the fleece and lining. Quilt, then cut the 18 1/2" x 30 1/2 from fabric A and the pockets and the sides from fabricB. This information is at the top of page 2, but we updated the pattern a while back so if you don't have this, please email me at wpcreek @wpcreek.com.
You are correct about WOF, it is width of fabric, generally 44"
I hope this is helpful, but please contact us if we can be of further assistance